Honiton Primary School

EYFS
At HPS we believe passionately that young children learn best when they have a balance of direct and group teaching sandwiched between large chunks of carefully planned, open-ended play. We use the '3-M's' (Mathematics, Mark-Making and Making Conversation) in all our interactions, using our knowledge of your child's next steps to help them make progress. This area of the website aims to provide you with information whilst also providing some simple ideas and resources to support your child at home.
Our One Page Profiles:


Our EYFS pedagogy:
At Honiton Primary School, our early years pedagogy refers to the principles and practices that guide the education and care of our children from when they join us in nursery, to when they leave us at the end of reception. It is a crucial stage in your child’s development, as it lays the foundation for their future learning and success. Our early years curriculum is designed to support our children's social, emotional, physical, and cognitive development. It provides opportunities for our children to explore, play, and learn through a range of activities that are developmentally appropriate and engaging.
One of the key principles of our early years pedagogy is that children learn best through play. Play-based learning is essential in the early years, as it allows children to explore and experiment with their environment, develop their creativity, explore social interactions and build their confidence. Play-based learning can take many forms, from imaginative play to physical play, supported by skilled practitioners who can guide and scaffold children's learning using, 'The 3'M' approach to child / adult interactions.
Another important principle of our early years pedagogy is that learning should be child-centred. This means that our team focuses on the individual needs and interests of each child, and provides opportunities for them to learn at their own pace and in their own way. We also work closely in partnership with parents and carers to ensure that children's learning is supported not only at school, but also regularly at home.
Overall, we believe that early years pedagogy should be based on a holistic approach to children's development, which recognises the importance of supporting children's social, emotional, physical, and cognitive development through play-based learning and child-centred practice. By providing a high-quality early years education, we can give our children the best possible start in life and help them to achieve their full potential as they begin their learning journey at Honiton Primary School.
But all they do is play? What do they actually learn?!
What is a Good Level of Development? (GLD)
The term "good level of development" is often used in the context of early years education and refers to the level of development that children are expected to achieve by the end of the Early Years Foundation Stage (EYFS) in the UK. The EYFS is a framework that sets standards for the learning, development, and care of children from birth to five years old.
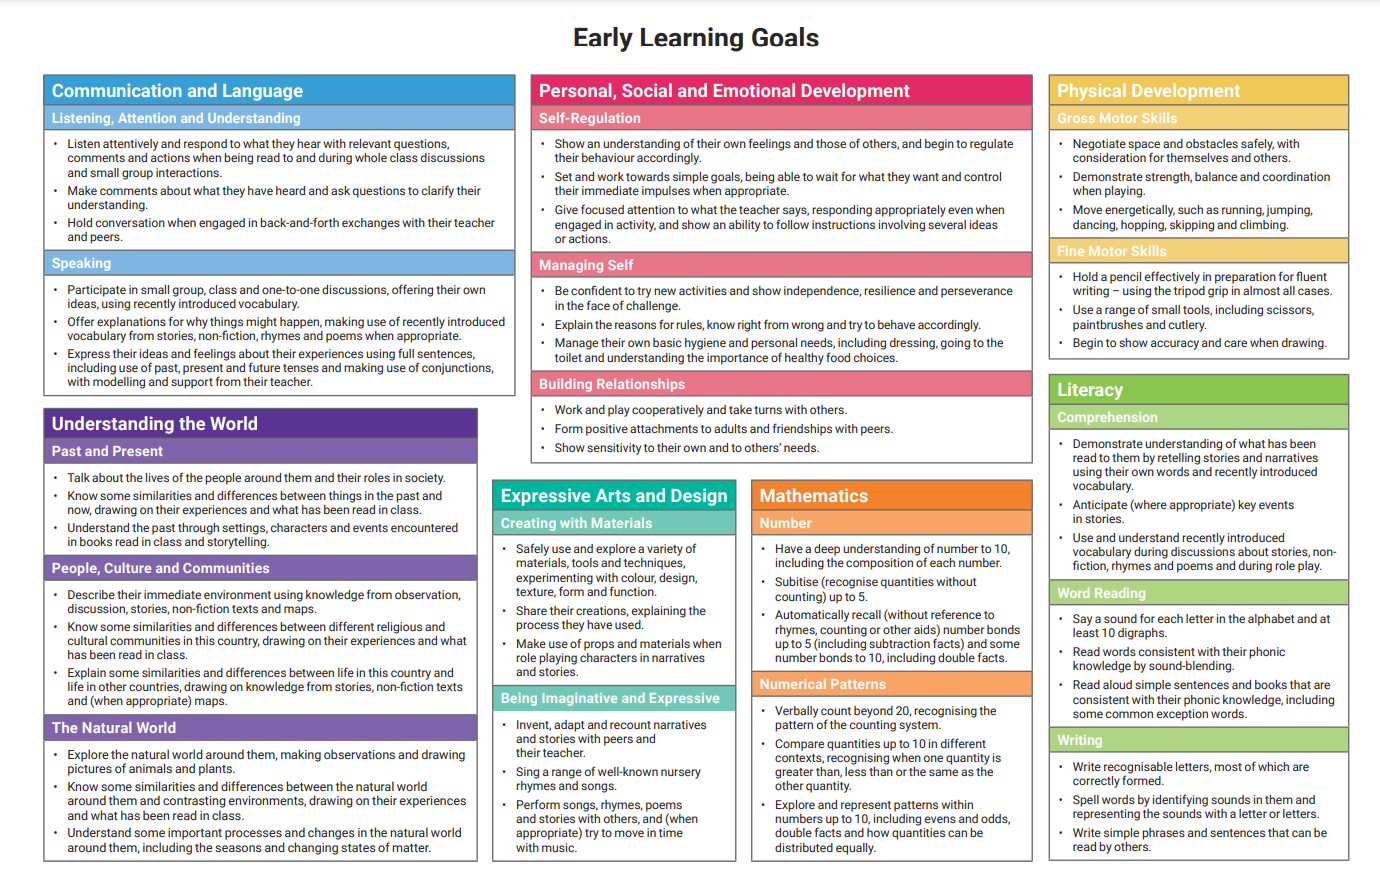
A good level of development means that children have achieved the expected level of development across all areas of learning in the EYFS. These areas include: communication and language, physical development, personal, social and emotional development, literacy, and mathematics. To achieve a good level of development, children need to make progress in each of these areas throughout the EYFS. This progress is assessed through a range of observations, assessments, and activities carried out by practitioners in the early years setting. By the end of the reception, children are assessed against the Early Learning Goals (ELGs) which are the expected levels of development in each of the areas of learning.
A good level of development is an important indicator of a child's readiness for the next stage of their education. It shows that they have the necessary skills and knowledge to progress to Key Stage 1, where they will continue to build on their learning and development.
Phonics and Early Reading (Little Wandle)
The early stages of learning to read are so important for your child’s development. We want you as a parent to be as involved as possible in being part of their reading journey. Our aim is to support all parents in gaining confidence to support their child in practising reading at home. We hope you find the guide below useful and please speak to your child’s class teacher if you would like further information.
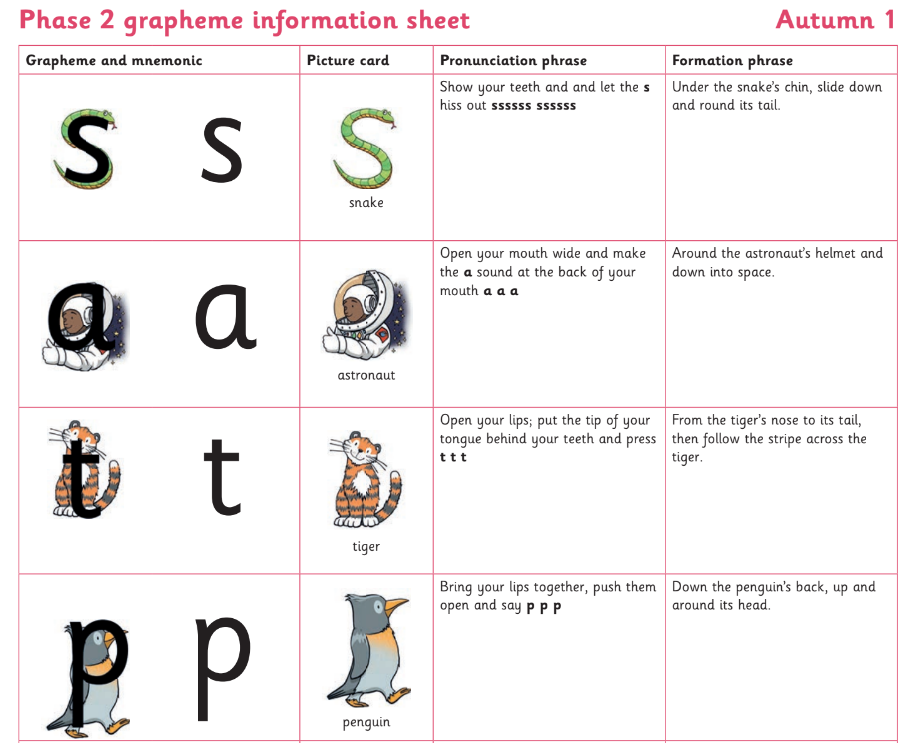
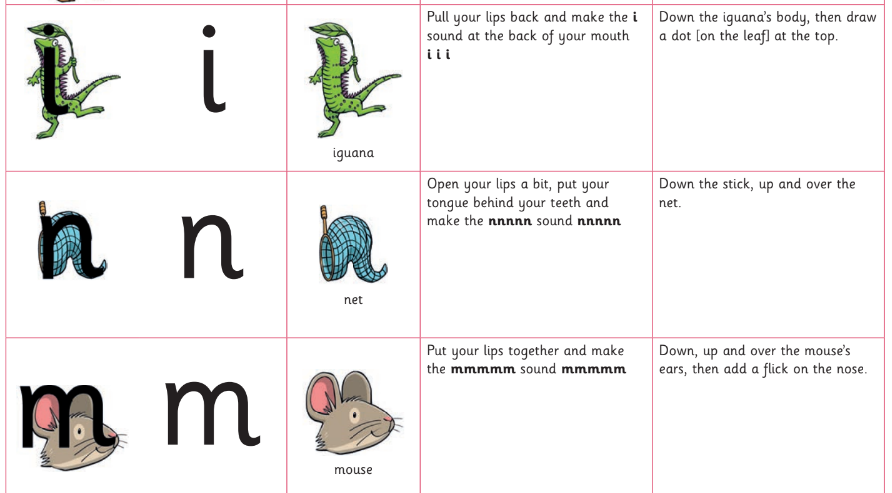
At Honiton Primary School, we use 'Little Wandle' as our systematic synthetic phonics programme for early teaching of reading and writing. Phonics is making connections between the sounds of our spoken words and the letters that are used to write them down. Our phonics teaching follows the cycle of revisit and review, teach, practise and apply. Our aim is to teach children to sound out and blend in order to read words.
Terminology:
Below are words that your children will become familiar with as they are taught the phonics programme:
Grapheme – The letter or letter group which is the sound (phoneme) written down
Phoneme – The smallest unit of sound that can be identified in words
Blending – When reading a word, identify the graphemes in the word and say the corresponding sounds in order to hear the word as a whole. E.g. read cat c- a- t
Segmenting – When spelling a word, break it down into the sounds you hear and write the grapheme for each identified sound. E.g. say shop = writing c- a- t
Decode – Breaking a word down into sounds to be able to read it.
Encode – Breaking a word down into sounds to be able to spell it.
Digraph – When two letters make one sound when they are together. E.g. shop
Trigraph – When three letters make one sound when they are together. E.g. night
Split digraph – When two letters that are “split” by having another letter in the middle of them. E.g. a_e in game or i_e in tide.
Tricky words – These are words that the children won’t have been taught to decode yet as they haven’t learnt the spelling rule. Therefore, they will be taught to read them by sight.
Resources to reinforce learning at home:
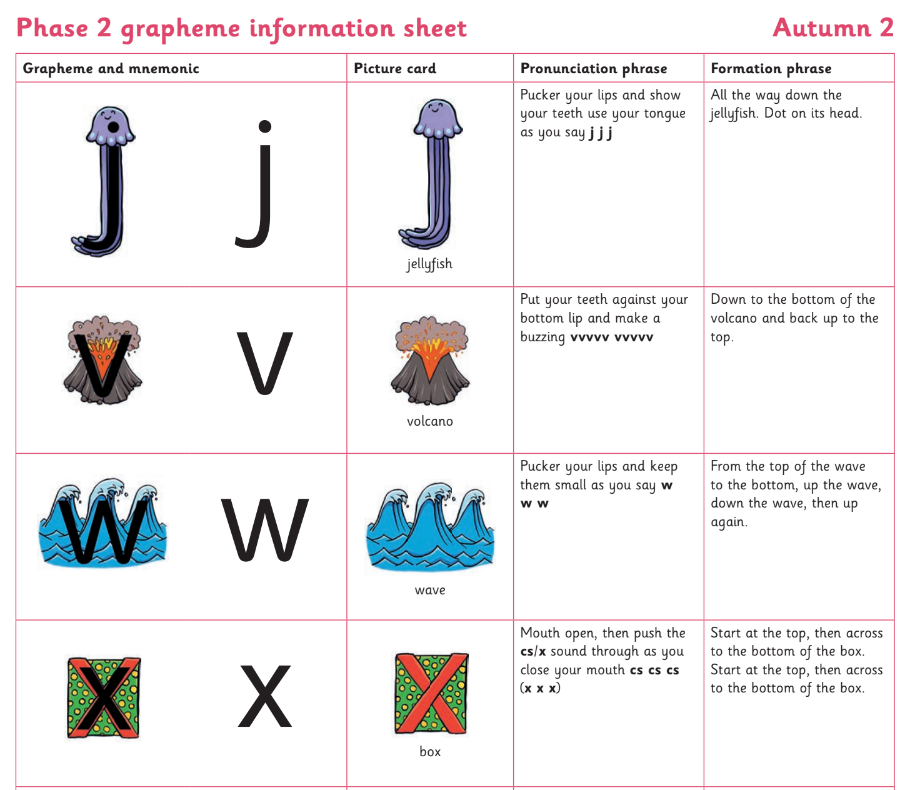
Phase 2 information sheets:
Autumn 1.
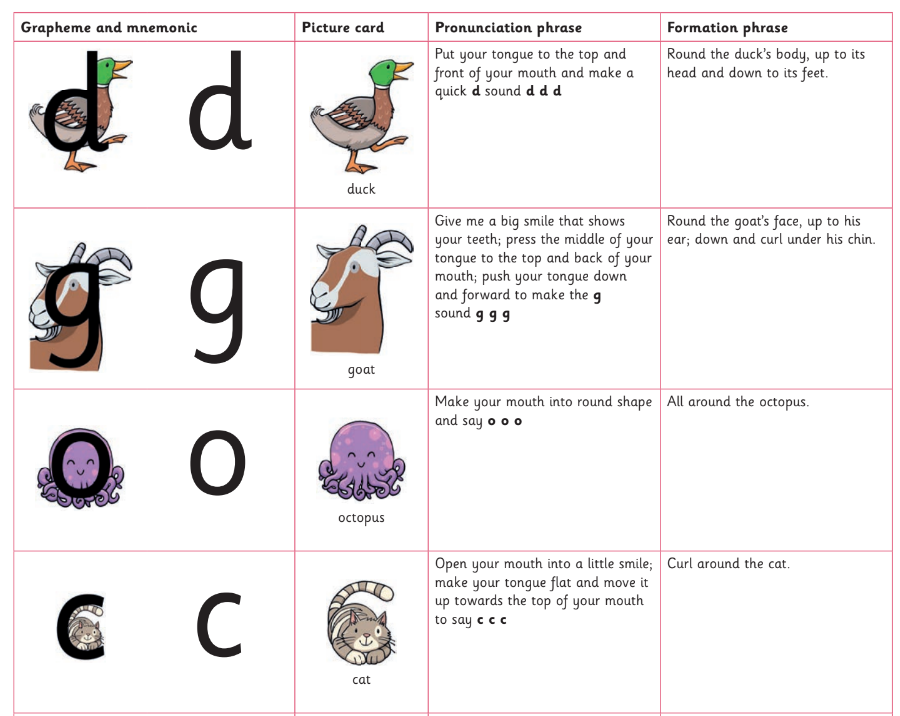

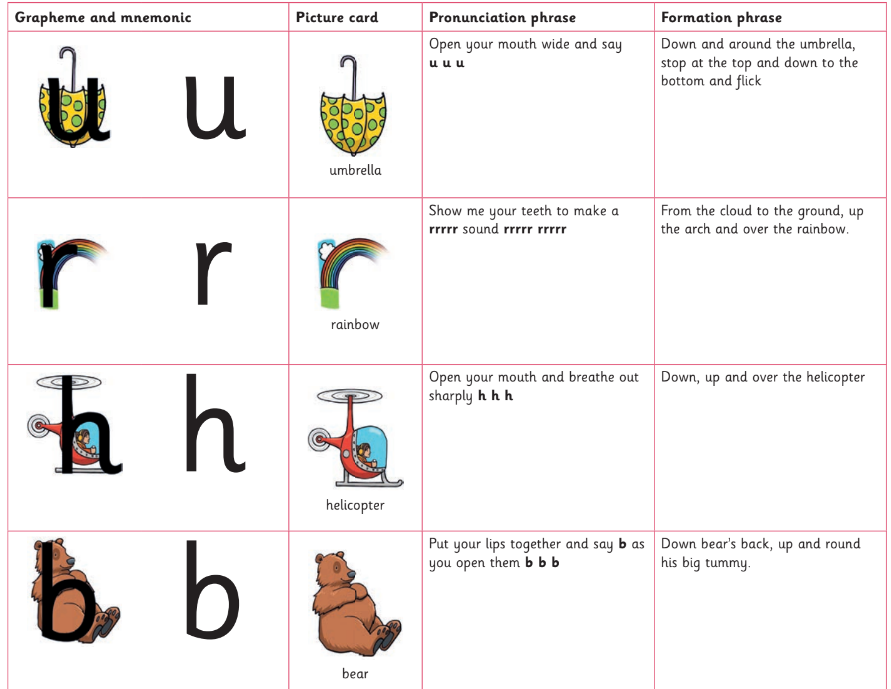
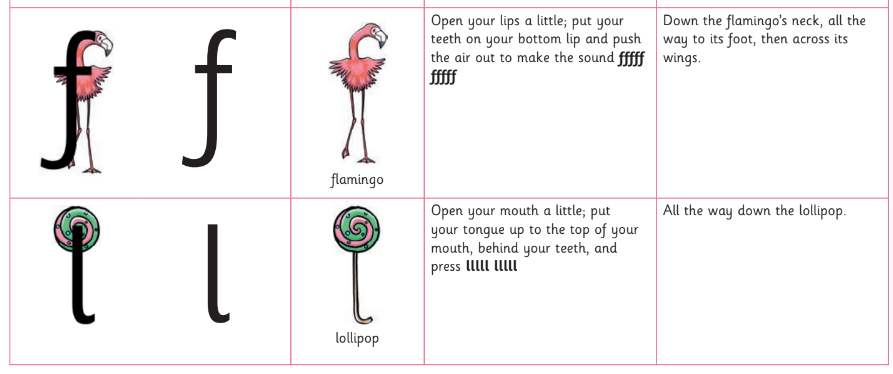
Autumn 2.
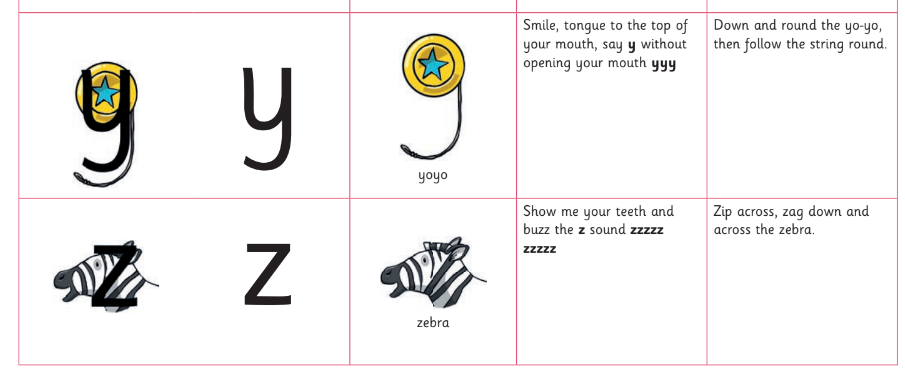
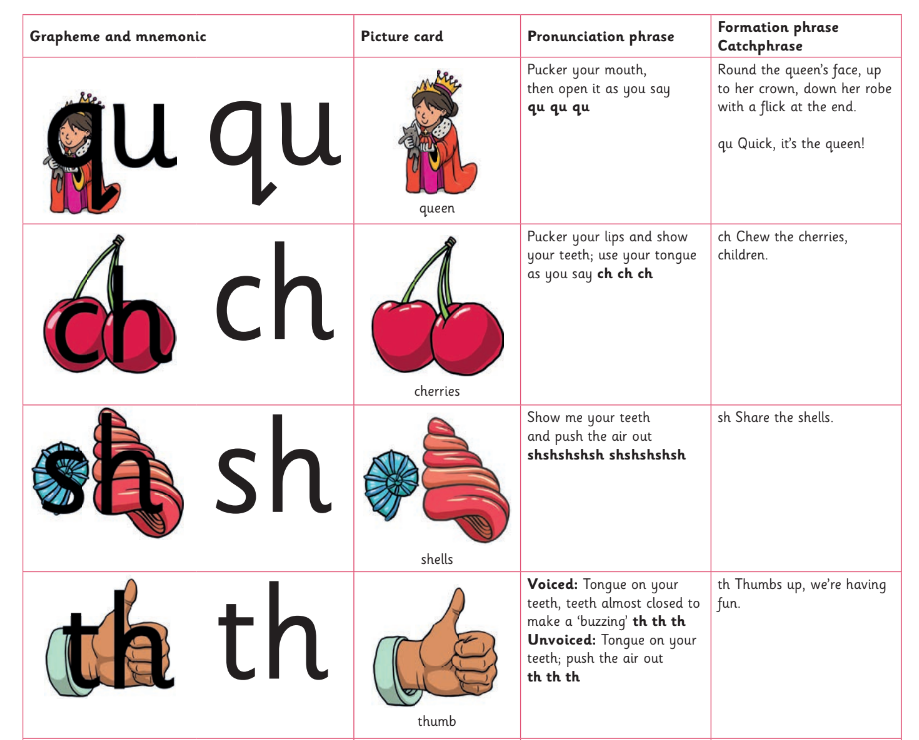
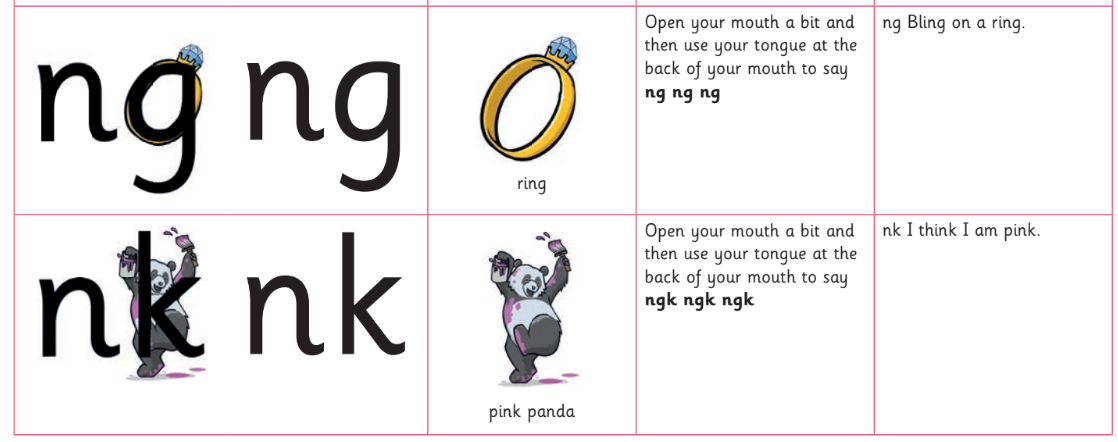
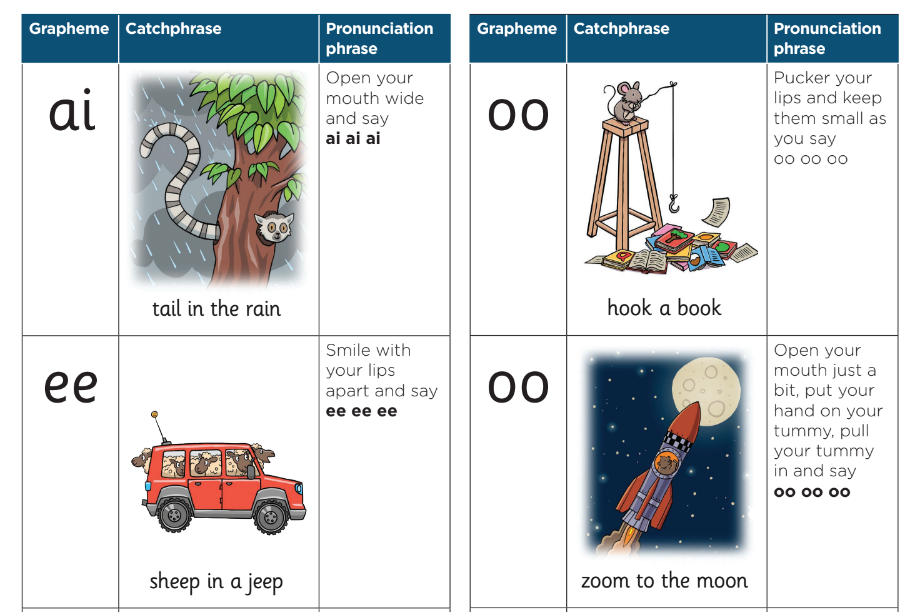
How to say Phase 3 sounds:
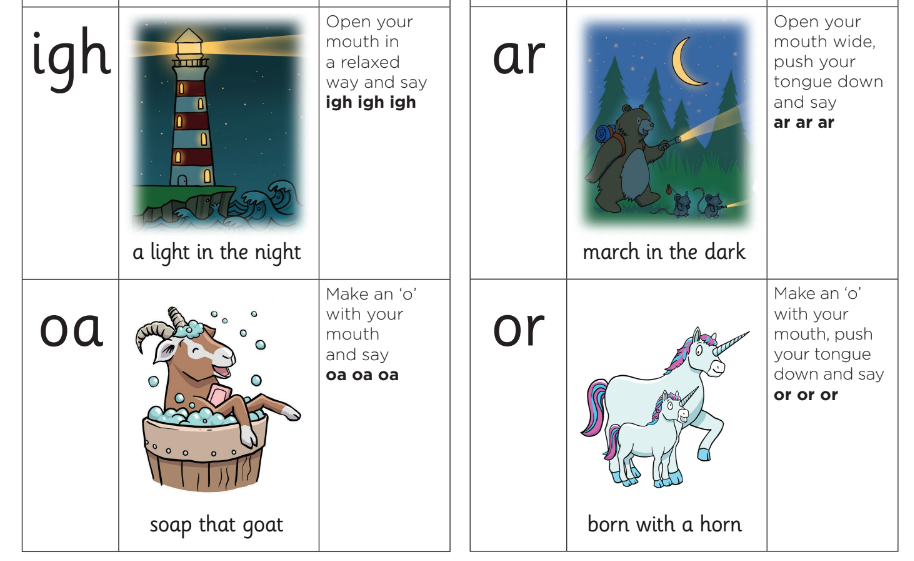
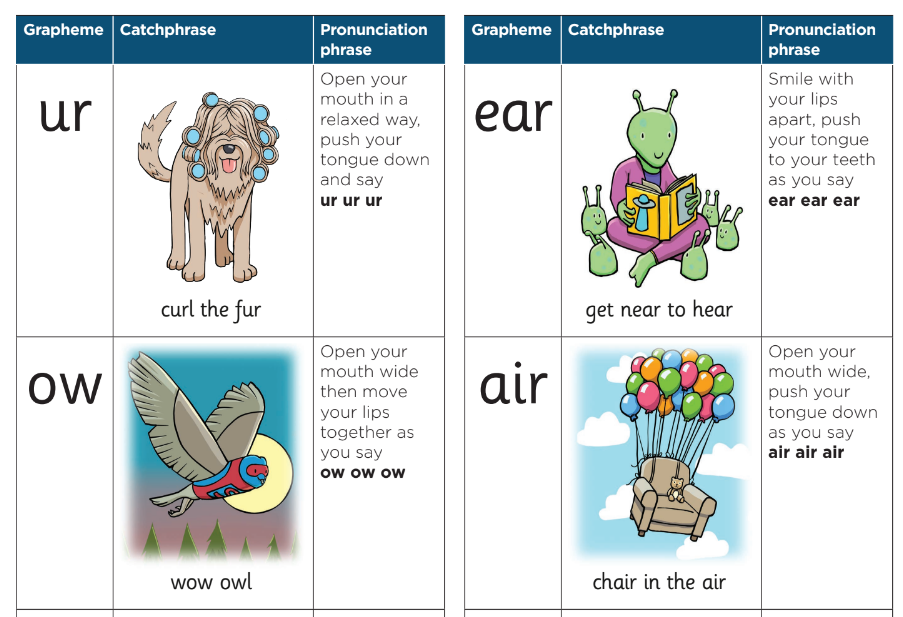

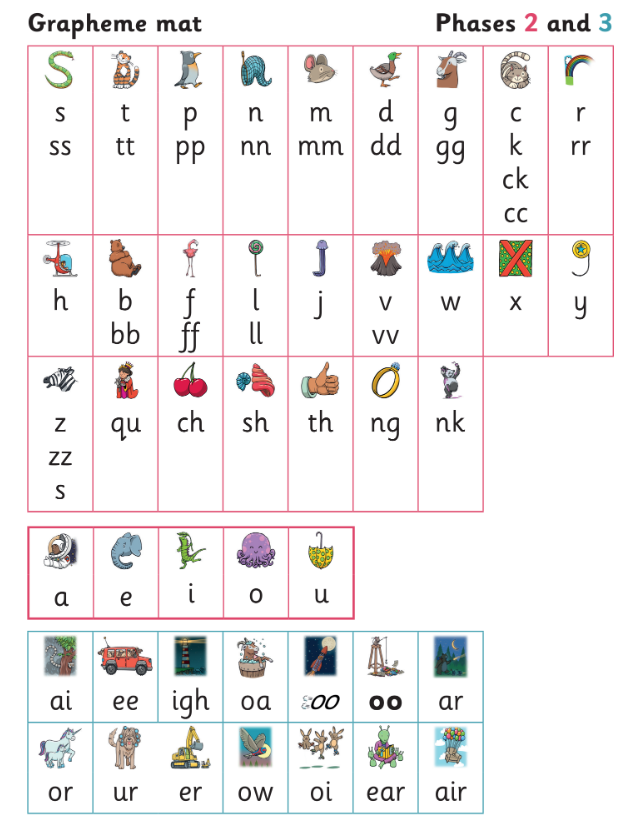
Phase 2 & 3 grapheme mat:
Handwriting
Getting Ready for Handwriting
To support your child with learning how to write, you could try these different activities at home.
1. Building muscles-
The first thing to do is work on strengthening the whole arm. If the arm isn’t strong, the fingers won’t be strong either, and holding the pencil properly will be difficult. Make sure your child is getting lots of time to play—ride bikes, throw and catch balls , swing, climb trees, cross monkey bars, go swimming—things that strengthen the whole body, and therefore strengthen the arms as well.
Helping with jobs around the home can also be great strengthening activities. Mop the floor, push a wheelbarrow, dig the weeds, sweep some leaves, hoover the carpets, wash the dishes. All these activities require upper body strength, which is needed for writing.
2 Building muscles in the hand-
Small hand muscles get very tired when a child starts learning to write if they aren’t strengthened properly. Kneading dough, playing with play dough, and putting pennies in a bank all work those small hand muscles. So does sewing, knitting, using scissors, threading beads, painting pictures, working on jigsaws, playing with slime and building with lego.
3- Practise holding a pencil properly-
We encourage the use of a “tripod grip, ” which means you grip the pencil with three fingers: the thumb, first or index finger, and middle finger. An ideal grip involves the child pinching the pencil between the thumb and first finger, using the middle finger as a stabiliser under the pencil. The other two fingers of the hand should not be touching the pencil. You could begin with wider pencils and pens before moving onto narrower writing tools.
4- Practise holding a pencil without writing letters-
Mazes, dot to dots and colouring books are all amazing ways at practising holding a pencil or a pen without actually having to practise writing letters.
5- Crossing the midline-
Crossing of the midline is the ability to rotate and efficiently reach across the midline of your body (an imaginary line down the centre of the body and limbs) to complete gross and fine motor activities.
Efficient crossing of the midline is important for visual perceptual learning (e.g., understanding how to form shapes, copy and form letters for handwriting), as well as the coordinated use of both sides of the body (e.g. 'helper & doing' hand while using scissors).
To help you could try some of these:
• Race cars around a figure 8 picture with one hand and then the other
• Container play- place the containers about a metre apart the child sits or stands in the middle and moves objects from one container to the other. Left to right and vice versa.
• Simon says- ask the children to copy your body positions e.g. left hand on right knee, left hand on right ear etc.
• Hand clapping songs which involve crossing midline ‘ A sailor went to sea, sea ,sea ‘
• Printing either rubber stamps or potato prints. Have a strip of paper running horizontally in front of child and stamp left to right and vice versa.
• Doing a Brain Gym cross crawl activity helps to develop better coordination of the two body sides. It is said to activate full mind and body function.
• Drawing large shapes on a blackboard or whiteboard where the child crosses the body midline (must be standing directly in front of board with no movement of the feet). This can be a chasing game with an adult drawing a line and the child having to follow. Or, you could fill a large area with lots of swirling shapes and patterns and ask the child to colour them in.
6. Practise letter formation without a pencil-
If your child is reluctant to pick up a pen or pencil, you can practise letter formation without them. Ask your child to practise writing letters with their fingertips in shaving foam sprayed on the side of the bath or in a sand pit. Some children prefer practising their letters on mini-whiteboards using a whiteboard pen so that they can rub off their mistakes. You could write the letter for them on the whiteboard and then ask your child to trace over it with their finger, thereby rubbing it off! Chalking letters outdoors on the ground or using paintbrushes and water are excellent ways to practise letter formation outdoors. Another activity that the children love is tracing letters onto someone else's back for them to try and guess what they have written.
Letter formation in Reception and KS1
In Reception and KS1, we focus on teaching the correct formation of each lower case letter. We use the following Little Wandle phrases to ensure that children are starting all of their letters in the correct place and that they are correctly formed. ![]()
Forming Capital Letters
Here are the phrases that we use in Reception and KS1 to help us to ensure that children are forming their capital letters correctly.
![]()
Ascenders and Descenders
At Rochester Riverside, we ensure that our handwriting is always sitting neatly upon the baseline. Ascenders and descenders are introduced quickly to children in order to ensure that their letters are the correct size relative to one another.
An ascender is the upwards part of a letter that exceeds the main line of font. The lower case letters that have ascenders are: 'b, d, f, h, k, l and t'. The opposite of an ascender is a descender that has a portion of the letter going below the baseline. The lowercase letters that have descenders include: 'f, g, j, p, q and y'. (Please see above for correct formation of these lowercase letters.)
Correct Sitting Posture for Handwriting
When practising handwriting, we encourage children to be seated at a table with:
- Feet flat on the floor
- Thighs parallel to floor and knees at a 90 degree angle
- Back up straight, inclined towards the desk and pivoted from the hips
Forearms resting on desk with elbows level with the desktop at 90 degrees - Paper stabilised with non-dominant hand
- Neck and shoulders relaxed
- Body faces desk squarely so non-dominant arm can support body weight
Paper tilted to the up to the right (if right handed) or up to the (if left handed)
![]()
How can I support my child with their maths at home?
To best support your child's mathematical development it is important to dedicate time to focus on mathematics on a regular basis, exploring mathematics through different contexts; including storybooks, puzzles, songs, rhymes, puppet play, and games. This helps to integrate mathematics throughout the day (both in and out of school) and makes the most of moments to highlight and use mathematics, for example, in daily routines, play activities, and out of school environments.
Using manipulatives (objects) and representations (drawings) can be powerful tools for supporting young children to engage with mathematical ideas. It is important to ensure that children understand the links between the manipulatives and the mathematical ideas they represent. Encouraging children to represent problems in their own way, for example, with drawings and marks, and using manipulatives and representations to encourage discussion about mathematics can also be beneficial.
Activities to try at home...
There are many activities that can support mathematical development at home in the early years. Here are some examples:
-
Counting: Encourage children to count everyday objects such as toys, books, and food items. You can also count steps when walking up stairs, or count how many times you jump. Counting songs and rhymes can also be fun and engaging.
-
Sorting and matching: Provide opportunities for children to sort and match objects based on different attributes such as size, shape, color, and texture. For example, they can sort buttons by color or match socks by pattern.
-
Patterning: Encourage children to create and identify patterns using different materials such as beads, blocks, or stickers. You can start with simple patterns like ABAB or ABBABB and gradually increase the complexity.
-
Measuring: Provide opportunities for children to measure and compare different objects using non-standard units such as paperclips or blocks. For example, they can measure the length of a book or the height of a tower.
-
Shapes: Encourage children to identify and describe different shapes in their environment. You can also provide materials for them to create their own shapes using playdough or construction toys.
-
Cooking and baking: Involve children in cooking and baking activities that involve measuring, counting, and following instructions. For example, they can help measure ingredients or count how many cookies are on the baking tray.
-
Board games: Play board games that involve counting, matching, and strategy. Games like Snakes and Ladders, Uno and many Orchard Farm games can be great for developing early math skills.
Remember to keep the activities fun and engaging, and to follow the child's lead! Encourage their curiosity and exploration, and provide opportunities for them to ask questions and make connections.